- Home
- Scotland's changing climate
- Urban Housing in Scotland
- Maintenance
- Ventilation
- Airtightness
- Insulation
- Lofts - insulation at ceiling level
- Lofts - insulation at rafter level
- Cavity wall insulation
- Solid Walls: Internal vs External Insulation
- Internal Solid Wall Insulation (IWI)
- External Solid Wall Insulation (EWI)
- Timber frame retrofit
- Windows and doors
- Openings in 'historical' buildings
- Openings in 'non-historical' buildings
- Ground floors
- Suspended floors
- Suspended floors - from below
- Suspended floors - from above
- Solid floors
- Insulation materials
- Building science
- Space heating
- Solar energy
- Product Selector
Achieving airtightness
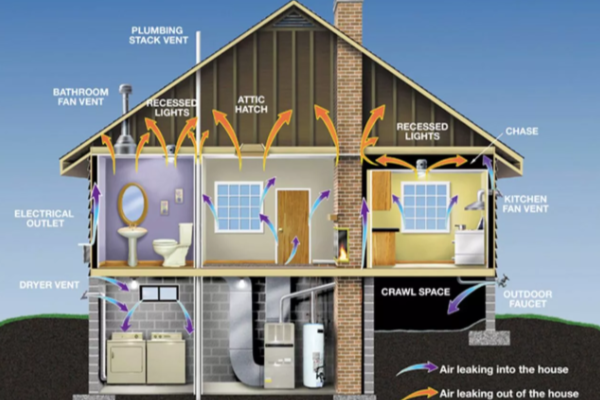
Airtightness in buildings refers to the property of a building envelope (the external shell of the building, including walls, roof, doors, and windows) to prevent the uncontrolled exchange of air between the interior and exterior of the building. An airtight building has minimal unintended air leakage, meaning air movement occurs only through intentional ventilation systems or openings designed for that purpose.
The level of airtightness in a building is typically measured using a metric called the Air Changes per Hour at a given pressure difference (ACH50). ACH50 represents the number of times the air inside the building is replaced with outside air in one hour when a pressure difference of 50 pascals (Pa) is applied. The lower the ACH50 value, the more airtight the building.

Suitable airtightness targets
Current new-build standards
• In Scotland, new homes currently (2018) need to achieve an air permeability of no more than 7 m3/hr/m2 at 50 Pa whereas the threshold in England and Wales is 10. Beyond these figures, the new house has failed and remedial measures need to be taken.
• If the figure is below 3.5, the Technical Standards recommend mechanical ventilation.
• Conventional extract fans with trickle vents are only acceptable for figures between 5 and 7.
• Although these new-build regulations do not apply in renovation projects, it makes sense to attempt to replicate similar levels of performance.
Passivhaus
• The Passivhaus approach when renovating older buildings is known as the ‘ENERPHIT Standard’ and requires a n50 of 1.0 m3/hr/m3 at 50 Pa.
• Although n50 and q50 are not directly translatable, for most buildings the results for both are fairly similar. Whilst it is not always feasible or cost effective to renovate to that exacting standard, we would generally recommend figures of air permeability lower than 3 for renovation projects but with accompanying carefully designed ventilation and a concerted effort to engage occupants in the ongoing maintenance of good conditions.
Achieving and airtight retrofit building
Achieving airtight buildings is covered in detail in a previous SEDA Guide: Design for Airtightness, available on SEDA’s website: www.seda.uk.net.
At the design stage, the following should be considered:
• creating a performance specification to establish targets, the methodology for achieving these and roles and responsibilities
• conceiving the building of a series of zones and ensuring that the air control layer is clearly shown on all drawings
• identifying all of the likely penetration points through the air control layer and where possible grouping them to concentrate the areas where airtightness works will be needed
• where possible ensuring that the details for achieving airtightnessare visible, simple (buildable) and formed from ‘positive’ mechanical connections, rather than relying on adhesive.
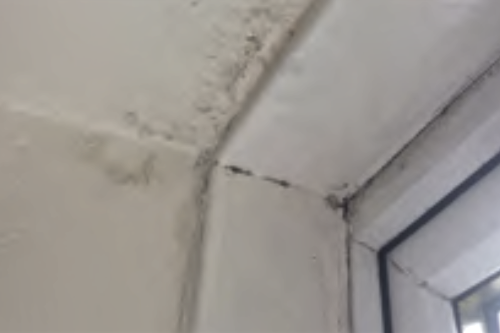
Example of mould / damage due to cold air behind plaster board or window reveal
The infiltration level of a property can be established accurately using a pressurisation test, which measures how ‘leaky’ a building is.
Inspection
Allow for sufficient inspection of the works and ensuring the Contractor has a nominated ‘champion’ for the airtightness.
Pressure tests
Ensure that at least two pressure tests are undertaken; the first when all airtightness layers have been installed, but before these are covered over by the final finishes, and the second towards the end of the process (but not so later that there is no time for remedial works!)
Thermography
It can be helpful to carry out thermography while the air pressure tests are being carried out to help everyone involved see if there are any other hidden issues. The first test should also include for an air leakage audit which identifies the causes and locations of all leaks, rather than simply giving an overall air permeability figure.
DIY pressure test kits
There are ‘DIY’ air pressurisation kits available which allow contractors to test their own projects whenever they want, forming an internal QA process which provides training and ensures that there are no nasty surprises when the independent tester arrives at the end.
Independent final test
Apart from self-tested results, the final test should ALWAYS be independently commissioned by the client or design team.
SEDA guide available
SEDA’s ‘Design and Detailing for Airtightness’ includes a useful checklist of common places to inspect for air leakage points.