- Home
- Scotland's changing climate
- Urban Housing in Scotland
- Maintenance
- Ventilation
- Airtightness
- Insulation
- Lofts - insulation at ceiling level
- Lofts - insulation at rafter level
- Cavity wall insulation
- Solid Walls: Internal vs External Insulation
- Internal Solid Wall Insulation (IWI)
- External Solid Wall Insulation (EWI)
- Timber frame retrofit
- Windows and doors
- Openings in 'historical' buildings
- Openings in 'non-historical' buildings
- Ground floors
- Suspended floors
- Suspended floors - from below
- Suspended floors - from above
- Solid floors
- Insulation materials
- Building science
- Space heating
- Solar energy
- Product Selector
Lofts - insulation at ceiling level
• The roof takes the brunt of the weather, and problems here can work their way down into the building, so the roof represents the priority for maintenance.
• Heat in the air rises, so the roof and ceiling also represent the first priority for insulation and draught-proofing.
• Even if the loft has already been insulated, but not well, it is still the most cost-effective place to focus.
• It is important that there is a free flow of air above the insulation to keep the roof timbers dry and avoid moisture build-up and decay.

Our Guidance vs Conventional Guidance
Our guidance is different because of the emphasis we place on the many little details. This is because we have seen how much difference they make in reality to the overall effectiveness of the insulation, in what is the most important area to get right. We also place more importance on maintenance, preparing correctly, and the specific type of insulation to be used.
Application | Conventional Guidance | Our Guidance |
|---|---|---|
ENERGY | 300mm insulation. Lay cross-ways. | 300mm insulation. No gaps. Lay cross-ways. Existing poorly laid insulation to be re-laid. Insulate over hoods at lights, etc. Create access above to avoid later compaction of insulation. Use ‘soft’ rolls to fit snugly. Use a ‘breather membrane’ over. Natural insulation reduces embodied energy. |
HEALTH | - | Effective insulation reduces mould risk internally & improves comfort. The use of natural insulation reduces respiratory health risks (mainly when installing) |
FABRIC | Maintain airflow above and at eaves. | Measures noted for Energy, Health, Maintenance and Moisture will protect building fabric from long-term problems. |
MODELLING | - | As Energy above – emphasis on little details in practice. |
QUALITY | - | As Energy above. |
MOISTURE | (Air flow above.) | Air flow above insulation removes moisture safely. Hygroscopic insulation helps protect timber. Insulation to water pipes to be vapour-proof avoids condensation problems. |
PEOPLE | - | Separate effort is required to remove/replace items stored in lofts. Invest in upgrading services etc. before installing insulation (less cost and disruption later). The walkway created allows for the use of the space for storage, etc. |
CONSTRUCTION | - | Soft insulation works better between timbers. Hygroscopic material helps protect timber from moisture problems. |
MAINTENANCE | Electrics above insulation. Plumbing insulated. | Ensure all external maintenance is carried out first. Review existing services/condition before starting—electrics above insulation (or in conduit). Plumbing insulated. The walkway provides safe access in the future. |
SIGNIFICANCE | - | Unlikely to be relevant. Otherwise, as Fabric above. |
Preparation
Clear out the loft
Usually, the loft has to be cleared. This one task often prevents any work from taking place as it isn’t usually taken on by insulation installers and, in some cases, can’t be done by householders. If more agile friends or family members cannot be persuaded to help, then this work can be done by paid odd-job tradespeople.
Review what’s there
Once cleared, it is worth reviewing the loft to ensure redundant cables and plumbing (such as old water tanks) are removed. Anything else that would interrupt the continuity of the insulation should also be removed unless it is structural!
Renew services
This is the time to renew any services and upgrade electric and telecom cables if required.
Protect cabling from overheating
All cabling that is not going to be raised above the insulation should be laid in conduit or covered in such a way as to prevent it from overheating beneath the insulation (ensuring some air movement around). (1)
Protect recessed lighting from overheating
If there are recessed light fittings in the ceiling below, these often have insulation removed above by electricians to avoid overheating, but this leaves gaps for heat to escape. The correct solution is to fit hoods over these, preventing them from being smothered by insulation while stopping heat escaping into the loft. (2)
Loft hatches
The size and location of loft hatches can be a problem and any necessary changes should be made before installation starts.
Storage
If the loft is to be used for storage, or if safe access is needed in future for services, then it is easiest to form the structure of the walkway or platform before insulation is installed. (3)
Use ‘semi-rigid’ type insulation
The best type of insulation to use is a soft roll or 'semi-rigid' type so that it is easy to fit snugly between timbers and against adjacent rolls and avoid gaps. It is also better to use a natural, hygroscopic insulation type. Refer to 'Insulation Considerations'.
Installation
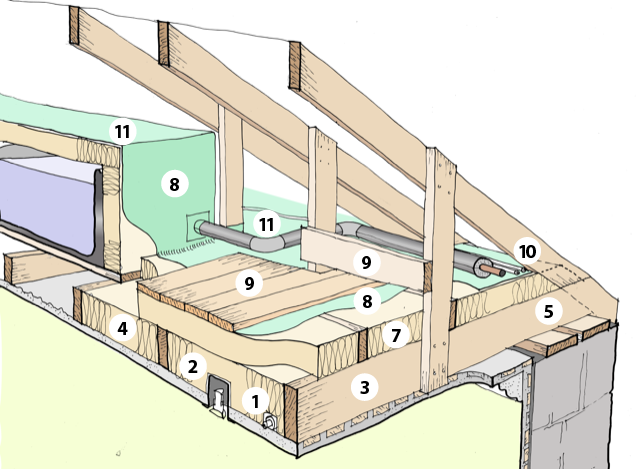
• If there is existing insulation, this can be left in situ if it is neatly installed or re-laid wherever required, taking care to identify existing cables. (4)
• The first layer of insulation should be laid carefully between joists, ensuring no gaps and that, where possible, insulation continues tight up to adjacent walls. (5)
• At eaves, achieving a continuous line of insulation means the insulation should be extended as far as possible over the wall head but leaving a small gap (25mm minimum) for air movement above if this is the airflow path. (6) See diagrams for more detail.
• Subsequent layers of insulation should be laid perpendicular to avoid the coincidence of gaps between rolls. Above the first layer of joists, truss pieces sometimes get in the way, and care needs to be taken to ensure that the insulation fits neatly around these without leaving gaps. (7)
• Once the insulation is installed, it is advisable to overlay a moisture-permeable (‘breather’) membrane, which is also airtight. This prevents ‘wind-washing’, which draws the heat from the outer layers of the insulation, reducing its efficacy. It is very important, however, that the membrane is ‘breathable’ to avoid condensation forming on the underside. (8)
• If the loft is to be used for storage or access in future, then a walkway needs to be built over the insulation and in such a way as to avoid crushing the insulation. It’s best to use timber boards with gaps rather than large format panels such as plywood due to the risk of condensation forming on the underside. Edge strips are advisable to stop feet or stored items from slipping onto the insulation, and some simple barrier is helpful for safety and stability. (9)
• Electric cables not within the conduit or protected beneath the insulation can be laid over the top of the insulation. Still, care needs to be taken where they penetrate the insulation to make sure there are no gaps where heat can escape. (10)
• Once insulated effectively, the loft can become as cold in winter as outside. To prevent freezing, any live pipework containing water must be fully insulated, including at all junctions, valves, etc. Tanks should have the insulation taken over the top of them and without any beneath so that they become, thermally speaking, part of the house below. The insulation used around pipes should be vapour-proof. This is to prevent the moisture in warm air from condensing on cold pipework, potentially creating as many problems as a leak in the roof. Needless to say, it is preferable to avoid plumbing in the loft if possible. (11)
• The same is true of air ductwork from mechanical ventilation systems. In a cold loft, any ductwork should be carefully insulated using a vapour-proof insulant to save energy and prevent condensation from forming.
• Ceiling hatches should be insulated to the same degree as the rest of the loft where possible. This is easier to say than to do in most cases. With simple lift-off hatches, a more rigid board type can be used to a similar depth, and rigid boards can also be cut around mechanisms for hatches with attached ladders. Also, provide a form of air seal when the hatch is closed.
Sketch showing the recommended arrangement of insulation, services, and access in loft
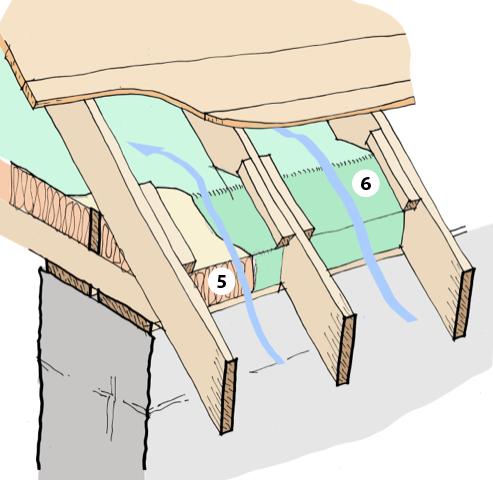
Eaves ventilation space maintained using battens to restrain insulation.
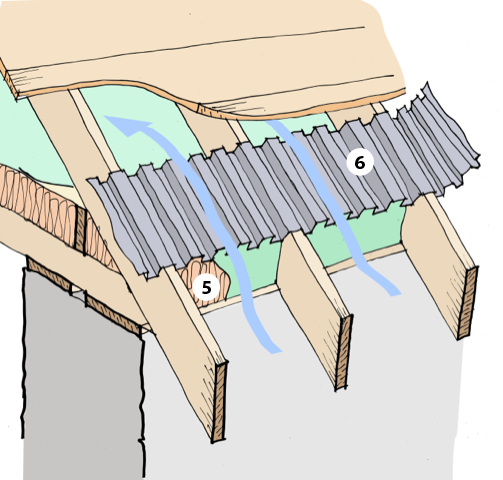
Sarking lifted and ventilation path formed using ‘rafter roll’ over rafters
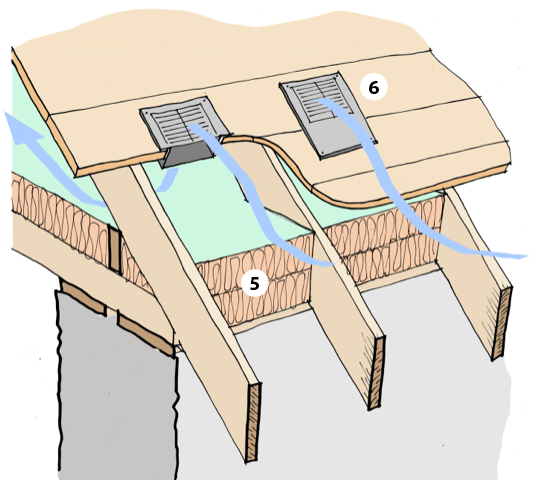
Eaves filled with insulation, roof space ventilated by fitting ‘slate vents’ through sarking
Alternatives
• Loose fill insulation
When insulating a ceiling, it is possible to use loose-fill insulation instead of the rolls discussed above. The same principles apply. Care needs to be taken that the material does not fall through gaps in the ceiling (for example at downlighters) or into wall cavities, nor that it gets blown into piles of uneven depth.
• Insulation beneath the ceiling
It is possible to install insulation beneath a ceiling and a number of proprietary materials are available to do this. This can be done in addition to insulating between joists above. The disadvantages are that it reduces ceiling height, and the components tend to be expensive, but one advantage is that a continuous layer of insulation applied like this reduces the thermal bridging effect of the timber joists.
Health & Safety
The most obvious risk is getting in and out of the loft, so ensure a safe and secure ladder is used with adequate space above and below, and handrails for stability. Works should be carried out on crawl boards to avoid stepping between the ceiling joists. Care should be taken where the roof above slopes down to form a confined space, especially in relation to nails protruding through the sarking boards. It is important to set up (if not already installed) both general and additional task lighting, and remember not to cover electric cables as noted above. Most synthetic fibrous insulations carry some risk to respiratory systems and can cause skin irritation, so good quality masks should be worn at all times and skin covered.
How Much is Enough?
Depending on the type of insulation, 300 mm of insulation will provide a ‘U’ value of around 0.16 W/m2K which is adequate for most properties and our guidance here is no different from conventional guidance. Beyond this level, the benefits of greater depths are likely to be compromised by the inevitable areas where that level of insulation is not feasible (eaves, loft hatch etc). Rather than aiming for more than 300 mm, it is far more important to ensure all of the gaps are closed, the loft hatch is well insulated and draught-stripped and that there are no ‘weak points’ in the installation generally.