- Home
- Scotland's changing climate
- Urban Housing in Scotland
- Maintenance
- Ventilation
- Airtightness
- Insulation
- Lofts - insulation at ceiling level
- Lofts - insulation at rafter level
- Cavity wall insulation
- Solid Walls: Internal vs External Insulation
- Internal Solid Wall Insulation (IWI)
- External Solid Wall Insulation (EWI)
- Timber frame retrofit
- Windows and doors
- Openings in 'historical' buildings
- Openings in 'non-historical' buildings
- Ground floors
- Suspended floors
- Suspended floors - from below
- Suspended floors - from above
- Solid floors
- Insulation materials
- Building science
- Space heating
- Solar energy
- Product Selector
Lofts - insulation at rafter level
• The roof takes the brunt of the weather, and problems here can work their way down into the building, so the roof represents the priority for maintenance.
• Heat in the air rises, so the roof is also the first priority for insulation and draught-proofing.
• Within the rafters, it is important that there is a free flow of air above the insulation to dissipate moisture and avoid timber decay.
Our Guidance vs Conventional Guidance
‘Semi-rigid’ hygroscopic v ‘Rigid plastic’ insulation
The biggest problem with insulating at the rafter level is that there isn’t usually enough depth within the rafters to get the thickness of insulation recommended. In conventional retrofit, where energy efficiency is the only objective, seeking the lowest lambda value for the insulation makes sense. So, guidance tends to suggest the use of high-performance rigid plastic insulants. There are three problems with this in practice;
• it is tough to cut and fit the boards perfectly, so there are always air gaps which compromise the high-performance boards,
• the insulation is compromised anyway by the timbers,
• using moisture-impermeable materials forces any moisture through the timbers, placing them at greater risk of moisture damage.
Carried out carefully, our guidance will lead to a solution that is effective in reality but with greater benefits to the long-term performance of the building. Our guidance is different because of the emphasis we place on the many little details, including maintenance.
Topic | Conventional Guidance | Our Guidance |
|---|---|---|
ENERGY | Insulate between rafters. Supplement with internal insulation if needed. | Insulate between rafters. No gaps. Supplement with internal insulation |
HEALTH | - | Effective insulation reduces mould risk internally & improves comfort. The use of natural insulation reduces respiratory health risks (mainly when installing) |
FABRIC | Maintain air flow above and at eaves. | Measures noted for Energy, Health, Maintenance and Moisture will protect building fabric from long-term problems. |
MODELLING | - | As Energy above - emphasis on little details in practice. |
FABRIC | - | As Energy above. |
MOISTURE | (Air flow above) | Air flow above insulation removes moisture safely. Hygroscopic insulation helps protect timber. |
PEOPLE | - | Invest in upgrading services, etc., before installing insulation (less cost and disruption later). Mid-way opening of the ceiling finish allows for a neater and more complete installation. |
CONSTRUCTION | - | Soft insulation works better between timbers. Hygroscopic material helps protect timber from moisture problems. |
MAINTENANCE | - | Ensure all external maintenance is carried out first. Review existing services/conditions before starting. Electrics above insulation (or in conduit) |
SIGNIFICANCE | - | It is unlikely to be relevant, but removing possibly original plasterwork may be an issue, otherwise -as Fabric above. |
Preparation
Existing roof covering
• In some cases, the external roof finish can be removed, and insulation can be inserted between rafters from outside. If internal finishes are retained, this allows for simple installation, leaving a 25mm gap along the outer edge of the rafters before replacing the roof finishes.
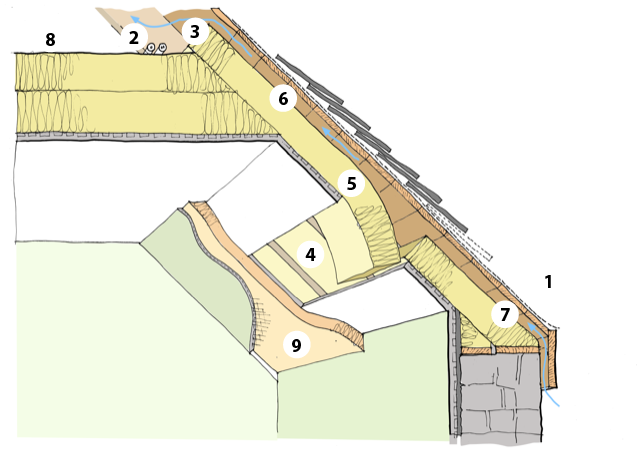
• Even if the roof finish isn’t to be replaced, it is often worth removing the first half-metre or so up from the eaves to inspect the condition of the rafter ends and the wall head (1). Any repairs can be carried out, and insulation can then be easily installed along the eaves, ensuring that ventilation is maintained above the insulation.
Protecting electric cables
• Electric cables within the rafters should be relocated or placed within the conduit to prevent overheating when covered by insulation. Ideally, they would be placed in a service void created on the structure's inner side. Where the cables penetrate the inner faces of the ceiling, they should be sealed carefully to prevent moisture and warm air from escaping into the construction. (2)
Installation
Insulation at Rafter Level
Sketch detail showing how much insulation can be installed in coombes with limited damage and disruption
• If the ceiling finish is original lath & plaster and it is desirable to avoid damaging this, the question is how to get the insulation into all areas. It may be possible to push rigid boards in from a small attic space (3) or push down a softer roll-type insulation using a long, thin implement. However, in this scenario, it is hard to be sure that the insulation is filling all gaps well.
• Whilst retaining most of the original finish, cutting a horizontal strip mid-way within the coom is possible to allow insulation to be more carefully installed, extending neatly to the eaves and fully filling the space available (4). A 600mm wide strip allows for manoeuvring and can be replaced by a matching lath & plaster or a modern equivalent with all joins made good and re-decorated. Sometimes, ceilings have timber linings or similar boarded finishes, which make removal and replacement easier.
• It may be possible or desirable to remove all ceiling linings. The advantages of this are that it makes the insulation installation much more straightforward and allows for installing a vapour control and airtightness membrane before replacing ceiling finishes. The disadvantage is an increase in cost, disruption, mess and waste of resources
• More often, forming the horizontal strips mentioned above is possible, retaining most of the internal finish while ensuring insulation is installed neatly.
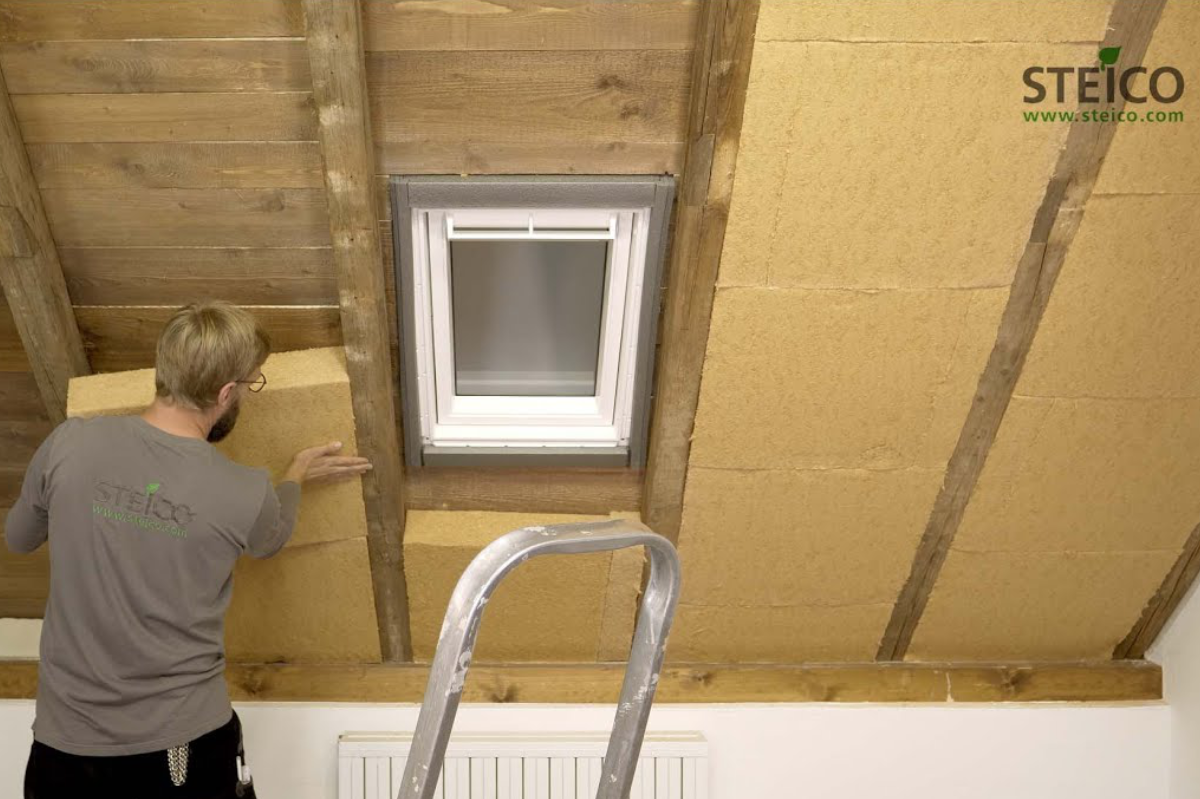
• The best type of insulation to use is semi-rigid so that it is easy to fit snugly between timbers and against adjacent rolls without the need to be perfectly cut to size. It is also better to use a hygroscopic material to protect the roof timbers from the risk of moisture build-up (5).
• However, it is achieved insulation should be inserted between each rafter, fitting tightly at all times, flush with the inner face and leaving about 25mm to the outer edge as a free area for air movement (6).
• At the eaves, the insulation should be extended as far as possible over the wallhead, leaving a 25mm gap for air movement if this is the airflow path. See diagrams for more explanation (7).
• Often, in ‘room in the roof’ spaces, there is a small ‘attic’ section formed by the cross-piece of the roof truss, and in these situations, the guidance for lofts can be used (8).
• In attic rooms, it is common to find dormer windows. With the rest of the roof insulated, these will represent a weak spot regarding heat loss. Although it can be pretty fiddly, it must be insulated to a similar level as the adjacent roof. This involves three separate tasks: the window, the ceiling and the side walls, all of which may require different treatments.
• Rooflights are highly effective at bringing in light, ventilation and fire escape from specific spaces but represent a ‘gap’ in the insulated envelope for heat loss. In conservation areas and on listed buildings, there may be a requirement to use ‘conservation’ roof lights, but it is also important to use a roof light with a good overall U-value and good airtightness. Quadruple glazed units and special insulated flashing packs are available, which ensure a better insulated and airtight installation.
Alternatives
Insulation beneath the ceiling using composite boards
It is also possible to install insulation across the inner face of the ceiling. Several components are available for this, including composite boards of plasterboard finish with rigid insulation bonded to the back. Installing these is quicker and simpler than the solution above, and this technique avoids the thermal bridging associated with the rafters. However, the components generally used are relatively expensive, and as this work reduces ceiling heights, often in already constrained spaces, there are limits to its applicability. As a solution, it is unlikely to provide enough insulation on its own. Still, if there is headroom and budget, it can supplement the insulation within the rafters described above. We have shown a natural, rigid board such as wood fibre fixed to the coom with a plaster finish as an option. (9)
Insulation beneath the ceiling using battens
An alternative to the composite panels described above is to install battens across the face of the ceiling and insulate between them. This solution can reduce thermal bridging by running battens perpendicular to the rafters and allows for the installation of a vapour control layer.
Flat roofs
The advice given here is equally applicable to flat roofs. Still, because flat roofs have to have a continuous waterproof layer to keep water out, it is even more important to ensure a good route for ventilation above the insulation and, usually, a robust vapour control layer beneath.
How Much is Enough?
Theoretically, a level similar to that installed in a loft is required, i.e. about 300mm, achieving a U-value of around 0.16 w/m2K. However, it is unlikely that this level of insulation can be installed within existing rafters, and even adding additional insulation beneath the ceiling may not get close to this level. In reality, it is more important to achieve a continuous layer of insulation across small loft spaces, around dormers and roof lights, and linking neatly with wall insulation as this will reduce heat loss more effectively.
Health and Safety
There is usually a need to access ceiling areas above head height, and in these cases, care should be taken to ensure safe access and a safe and secure working platform. Comments made above about the risks from fibrous insulation remain relevant, and it is common to find nails protruding through the timber sarking boards, which is an obvious risk.