- Home
- Scotland's changing climate
- Urban Housing in Scotland
- Maintenance
- Ventilation
- Airtightness
- Insulation
- Lofts - insulation at ceiling level
- Lofts - insulation at rafter level
- Cavity wall insulation
- Solid Walls: Internal vs External Insulation
- Internal Solid Wall Insulation (IWI)
- External Solid Wall Insulation (EWI)
- Timber frame retrofit
- Windows and doors
- Openings in 'historical' buildings
- Openings in 'non-historical' buildings
- Ground floors
- Suspended floors
- Suspended floors - from below
- Suspended floors - from above
- Solid floors
- Insulation materials
- Building science
- Space heating
- Solar energy
- Product Selector
Suspended Floors - Insulating from Above
Preparation
Move existing fittings
• Depending on the space, fixings like kitchen units and bathroom fittings and all furniture and floor finishes will need to be removed.
Remove floorboards
• The floorboards will need to be removed. This is usually difficult to do without damaging the boards, so some care is required if the boards are to be reused. All boards should have any nails removed to protect those handling them from that point onwards, even if they are to be disposed of.
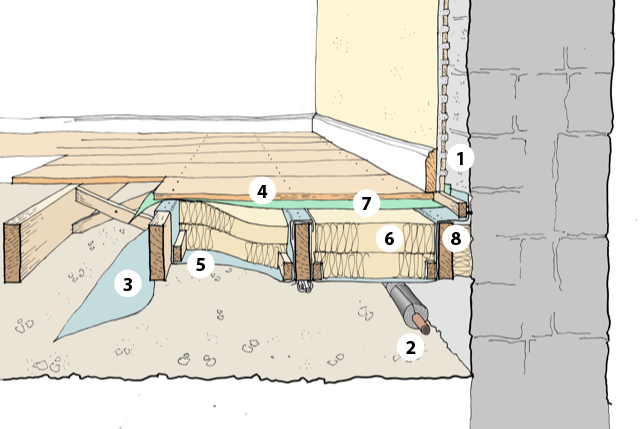
• It is possible to leave skirting boards in place, but removing them allows easy access along the edges to form the airtight seal and makes it easier to create a space for re-located cables [1].
Source: Ecological Building Systems
Ensure ventilation
• As mentioned above, it is important to check both the ventilation beneath the floor and the condition of the joists, particularly as they meet the walls. It is common for joist ends to requireestation, and the replacement is always worth decaying or allowing this possibility.
Review service
• The guidance related to water pipes and cables is the same as above but, in some cases, more difficult to achieve [2].
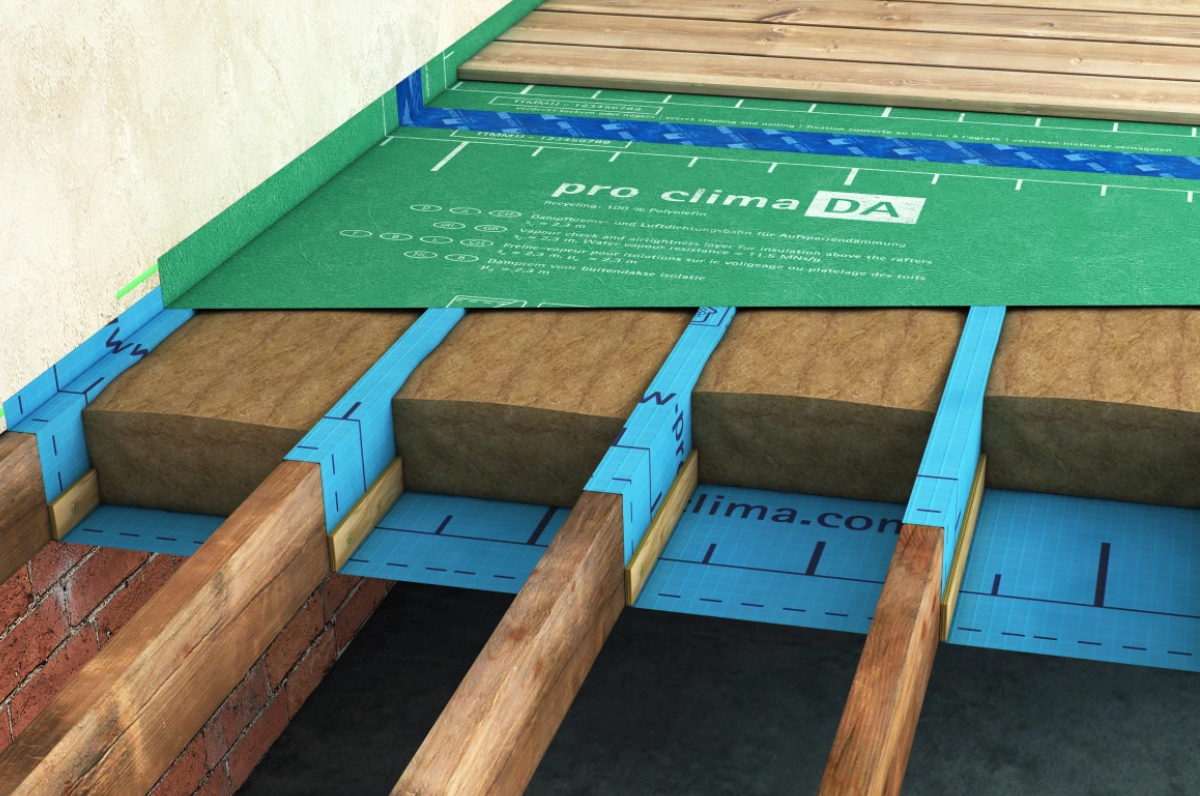
Sketch detail showing how insulation and airtightness can be installed on a suspended timber floor where there is only access from above
• Once boards are removed and services dealt with, it is possible to start the insulation works.
Vapour permeable membrane
• The same vapour permeable and airtight membrane discussed in the section above should be draped across the joists to hold the insulation in [3]. Because of the importance of sealing the laps between membrane rolls, running the membrane roll in the same direction as the joists is preferable so that the whole length of two or three joist runs is covered in one go. Then, the lap can be made over the top of a joist, firmly sealed using double-sided tape [4]. The membrane must be taught between the joists and tight against the joists to avoid the 'sagging' effect, which pulls the insulation away from the joist. To this end, a small batten is affixed to both sides' lower edges of each joist to ensure the insulation fills the whole space [5].
• The membrane also has to be sealed against the wall, which can be tricky. Along both sides where the joist ends meet the wall, one solution is to affix a batten (e.g. 50x50mm) to the underside of the joists and within 10mm of the wall. This allows the membrane to be fixed firmly to a solid background at every edge, and the small resultant gap is filled with a non-setting mastic or tightly stuffed with insulation material to effect a complete air seal.
Hygroscopic insulation
• The space is then fully filled with insulation [6]. The insulation should be hygroscopic but can be a soft roll or a loose-fill material as it does not need to hold itself up; the important thing is to ensure that it fully and neatly fills the space without any gaps.
Replace floorboards
• Afterwards, the original floorboards or an alternative board can be affixed back over the joists. If the floor finish is likely to be a single layer of timber floorboards, then installing a vapour control layer beneath these boards is advisable to minimise the air and vapour entering the floor from within the room [7]. If a deck is to be installed, such as OSB sheeting with other finishes to go over, then a VCL is probably not required as long as the OSB is taped at the joints and to the wall.
Services
• If services remain beneath the floor, which might require access in the future, it may be worth creating an access hatch close by, and the comments regarding this hatch from the section above apply.
Floor levels
• If the existing floorboards are replaced, or a similar finish is installed, there is no issue with floor levels; existing skirting boards and doors can be left as they are. However, it is sometimes decided to raise the floor levels to accommodate a service void or underfloor heating or to add more insulation above the joist level. Adding insulation is discussed in the following section on solid floors, but the principles remain the same.
Alternatives
• A common but more expensive alternative to the above is to form a cavity to place insulation by inserting a board across the lower sections of the joists resting on battens. This generally gives a more robust ‘base’ for the installation but requires quite a bit more work to cut the boards neatly. If supporting battens are placed on the lower sides of joists, then you lose some of the potential depth of the joist for insulation, but it is possible in some cases to run the battens beneath the joists. This detail does not provide complete airtightness, so all connections between boards and joists on all four sides should be taped.
Health & Safety
Working from above is much easier than below, but there are risks associated with joists toppling if not adequately braced, and this should be checked once the floorboards are removed. Joist ends should also be checked where they meet the walls to ensure they are sound and free from decay and infestation. It is important to always operate from a safe working platform. The best solution is to remove only part of the floorboards at one time, placing temporary boards over the working area until completion. Unless improved ventilation is formed beneath, there shouldn’t be any reason to disturb the solum, so dust raising shouldn’t be a problem.
How Much is Enough?
The comments for insulating from beneath remain accurate and relevant. Still, it may be necessary to factor in the possibility of adding more insulation, floor finishes or underfloor heating above the joists.